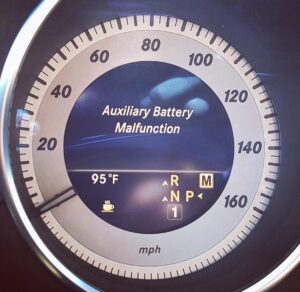
Seeing an “Auxiliary Battery Malfunction” warning on your Mercedes-Benz dashboard can be confusing, especially if you’re unsure what the auxiliary battery does. This message often points to issues with a secondary battery in the car, which supports critical electrical systems, including start-stop functions, electronics, and sometimes emergency braking or parking features. Here’s an in-depth guide to understanding, diagnosing, and addressing the “Auxiliary Battery Malfunction” warning.
What is the Auxiliary Battery?

Mercedes-Benz vehicles come with both a main and an auxiliary battery. The main battery powers the engine and primary systems, while the auxiliary battery supports electrical components when the vehicle is in idle or when the main battery needs to focus on essential functions. Models like the E-Class, S-Class, and many SUVs use an auxiliary battery for functions like the ECO start/stop system, memory seats, and other accessory features.
Common Causes of the Auxiliary Battery Malfunction Warning
Several issues can trigger the auxiliary battery warning:
- Aging or Weak Auxiliary Battery: Like any battery, the auxiliary battery can weaken or die over time, reducing its ability to support electrical systems.
- Faulty Voltage Converter or Relay: These components help manage power distribution between the main and auxiliary batteries. If they malfunction, they can prevent the auxiliary battery from receiving or delivering power.
- Loose or Corroded Battery Connections: Poor connections can prevent the battery from charging correctly, leading to inconsistent performance.
- Software Glitch: Sometimes, a minor glitch in the vehicle’s software can falsely trigger the auxiliary battery warning.
Step-by-Step Guide to Diagnosing and Resolving the Issue
Step 1: Scan for Diagnostic Trouble Codes
Start by using a Mercedes-Benz-compatible diagnostic tool, such as STAR DAS to scan for any fault codes. Look specifically for auxiliary battery-related codes, often labeled with “B” (for body or accessory issues) or with specific auxiliary battery identifiers. These codes can point directly to a problem with the battery or related components.
Step 2: Test the Auxiliary Battery Voltage
Testing the battery’s voltage can help determine if it’s weak or failing.
- Use a Multimeter: With the vehicle off, use a multimeter to test the auxiliary battery’s voltage. A healthy auxiliary battery should generally read between 12.4V and 12.7V.
- Replace if Voltage is Low: If the reading is below 12.Vit may be time to replace the auxiliary battery.
Step 3: Inspect Battery Connections and Cables
Loose or corroded connections can prevent the auxiliary battery from charging properly.
- Check for Corrosion: Look for any corrosion or dirt on the terminals, which can disrupt electrical flow.
- Tighten Connections: Ensure the connections to the auxiliary battery are secure. Loose cables can cause intermittent power issues, triggering the warning.
Step 4: Examine the Voltage Converter and Relays
The voltage converter manages power between the main and auxiliary batteries, and if it malfunctions, it may cause an auxiliary battery warning.
- Check Converter Voltage: Using a multimeter, test the voltage output from the converter to ensure it’s providing consistent power.
- Inspect Relays: Make sure the relays responsible for switching between the two batteries are functioning properly. Faulty relays may need replacement.
Step 5: Reset the Auxiliary Battery Warning
If the battery, connections, and components are all functioning normally, try resetting the auxiliary battery warning.
- Use Diagnostic Software: Through your diagnostic tool, navigate to the auxiliary battery warning and select “Reset.”
- Drive the Vehicle: After resetting, take the car for a short drive to ensure the warning doesn’t reappear. If the warning persists, recheck the battery and related systems.
Step 6: Replace the Auxiliary Battery (If Necessary)
If tests reveal the auxiliary battery is failing, replacing it should resolve the issue. Here’s a quick guide:
- Locate the Auxiliary Battery: Depending on your model, it could be under the passenger seat, in the trunk, or behind a panel in the engine bay.
- Disconnect and Remove the Old Battery: Disconnect the battery terminals, remove the battery, and safely dispose of it.
- Install the New Battery: Secure the replacement battery in place, reconnect the terminals, and ensure all connections are tight.
Step 7: Perform a Final System Check
After replacing or repairing the auxiliary battery, use the diagnostic tool to scan the system again. Verify that the auxiliary battery fault code has cleared and that the warning no longer appears on the dashboard.
When to Contact a Specialist
If you’re unable to diagnose or resolve the auxiliary battery malfunction warning after following these steps, it may be time to consult a Mercedes-Benz specialist. Auxiliary battery issues can sometimes be related to other electrical problems, which are best diagnosed with advanced tools and expertise.
As a certified Mercedes-Benz electrician technician, I specialize in diagnosing and resolving auxiliary battery issues and other electrical problems to keep your vehicle operating smoothly. Whether it’s a quick reset or a complete auxiliary battery replacement, I’m here to help. Reach out today to keep your Mercedes-Benz running flawlessly! 09015329867 Mercedes Benz engineer Abuja 09015329867 peluBenz.com


